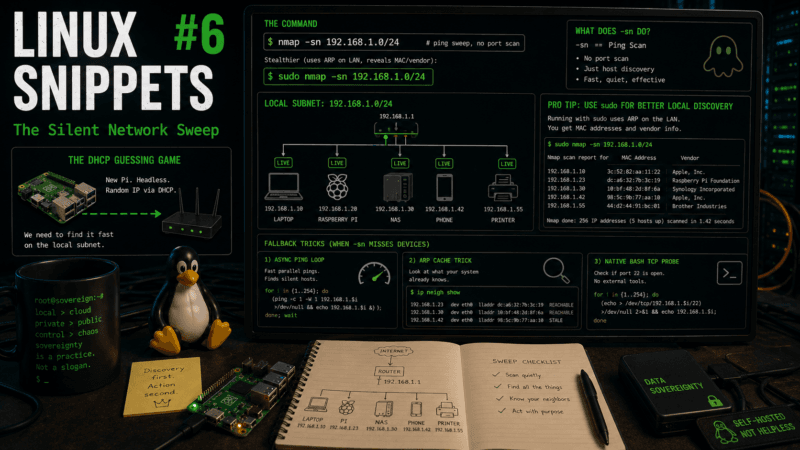
Introducing the “Sovereign Snippets” Series: Most of our time is spent in complex configurations, but the real power of a Linux system often hides in the short, punchy commands we use every day to maintain control over our hardware. I’m starting this series to document the specific “one-liners” I use to audit, secure, and manage my systems. No fluff—just functional tools for those who prefer the CLI over a GUI.
The DHCP Guessing Game
You just flashed a new Raspberry Pi, plugged it into the switch, and walked back to your terminal. Now you need to SSH into it. The problem is that your router’s DHCP server just handed it a random IP address somewhere in the 192.168.1.x range.
The traditional response to this is either logging into your router’s sluggish web interface to check the DHCP lease table or manually pinging random IPs until something responds. Both are a waste of time.
When you need an immediate, accurate map of every live device currently sitting on your local subnet, you use the industry standard: nmap.
The Command
To perform a rapid “ping sweep” of your entire local network, run this:
nmap -sn 192.168.1.0/24(Make sure to change 192.168.1.0/24 to match your actual subnet).
Breaking Down the Flags
nmap is famously loud and complex, capable of intense port scanning and OS fingerprinting. We don’t want any of that right now. We just want a headcount.
-sn: This is the critical flag. It tellsnmapto perform a “Ping Scan” and specifically disables port scanning. It simply checks if the host is alive and then immediately moves on. In older versions ofnmap, this flag was known as-sP.192.168.1.0/24: This is CIDR notation representing the target. The/24tells the command to scan all 256 IP addresses on that subnet (from.0to.255).
Because we disabled the port scan, the command finishes in seconds rather than minutes.
The output will give you a clean list of active IP addresses. But if you run it as an unprivileged user, nmap relies on standard ICMP echo requests (pings) and TCP ACK packets to determine if a host is up. Many modern devices (especially Windows machines with aggressive firewalls) simply drop these requests.
The Pro-Tip: Run the command with sudo.
sudo nmap -sn 192.168.1.0/24When run as root on a local ethernet or WiFi network, nmap switches its tactic. It sends ARP (Address Resolution Protocol) requests instead. ARP operates at Layer 2 (the data link layer), underneath the IP layer. A device cannot hide its MAC address from an ARP request and still function on the local network.
Running it with sudo forces even the most deeply hidden, firewall-hardened devices to respond, and as a bonus, nmap will automatically look up the MAC addresses and tell you the hardware manufacturer (e.g., “Raspberry Pi Foundation” or “Apple”).
The Zero-Dependency Fallback
What if you are SSH’d into a stripped-down Alpine container, a bare-metal router, or a minimal server environment where nmap isn’t installed? You don’t need a package manager; you just need to understand how Unix networking utilities interact.
1. The Asynchronous Ping Loop
Instead of pinging 254 addresses sequentially (which takes minutes if they timeout), we can spawn 254 background processes simultaneously.
For Bash / Zsh:
for i in {1..254}; do { ping -c 1 -W 1 192.168.1.$i > /dev/null 2>&1 && echo "192.168.1.$i is up"; } & done; waitFor Fish:
for i in (seq 1 254); begin ping -c 1 -W 1 192.168.1.$i > /dev/null 2>&1; and echo "192.168.1.$i is up"; end &; end; waitThe { } & in Bash and begin ... end & in Fish groups the ping and the echo commands together and throws the entire block into the background. The wait command pauses the prompt until all background jobs finish, dumping the results to your screen practically instantly.
2. The ARP Cache Trick
The ping loop above uses Layer 3 ICMP, meaning a strict firewall will ignore it and not print an “is up” message. However, for your machine to even attempt to send that ping over the local network, your kernel had to broadcast a Layer 2 ARP request asking “Who has this IP?” The hardened device must answer that ARP request to maintain network connectivity.
So, even if the pings time out, the device’s MAC address is now secretly logged in your machine’s ARP cache. You can view this cache using the modern iproute2 command:
ip neigh show(Or simply ip n). This will spit out a list of all IP addresses and their associated MAC addresses that your machine currently knows about. Just run the ping loop, ignore the output, and run ip neigh show to see the real map of the network.
3. The Native Bash Port Scan
If ICMP is entirely blocked and you are specifically hunting for a Raspberry Pi or a server, you only care if port 22 (SSH) is open. You can bypass ping entirely using Bash’s built-in pseudo-device files for TCP connections.
(for i in {1..254}; do { timeout 0.5 bash -c "</dev/tcp/192.168.1.$i/22" 2>/dev/null && echo "192.168.1.$i has SSH open"; } & done; wait)By redirecting input from /dev/tcp/IP/PORT, Bash natively attempts a TCP handshake without needing nc or nmap. We wrap it in the timeout utility so it doesn’t hang on dead IP addresses, and background it with &. It is an incredibly fast, stealthy way to find headless nodes using nothing but the shell itself.
Over to you: How chaotic is your home network mapping? Do you rely on static IP allocations for everything, or do you let DHCP run wild and rely on tools like nmap and ip neigh to find your hardware?
















DINDA AULIA AZZAHRA PUTRI PURWANTO
July 29, 2026 @ 08:10
Students in the **Electrical Engineering** program at Telkom University Surabaya study advanced computer network administration, local network scanning (including network mapping and ping sweeps), and data-link layer communication protocols such as ARP (Address Resolution Protocol) by utilizing command-line utilities like `nmap` and built-in Linux system commands (such as `iproute2`). A deep understanding of IPv4 subnet management, embedded network connectivity troubleshooting, and asynchronous hardware detection techniques equips graduates to design, configure, and secure computer network infrastructure efficiently and professionally.